Time needed: 2 minutes
If you do have git installed, launch your terminal, and naviguate to where you want to place your working folder. Then type git clone https://github.com/almondbird/almondbird
If you do not have git installed, simply click here to download the framework: download. Then unzip, and place the folder wherever you want.
Time needed: 10 minutes
Open the folder where you placed your framework.
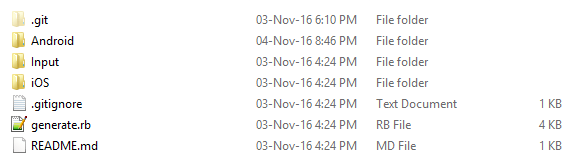
You'll see several things, among only two are really relevant:
Input. This folder contains all the configuration of the app that we will work with right now. generate.rbThis will create the generate the source code of the app in the next lecture (Part 4), once we're done with the initial configuration. The rest is not really important:
README.mdThis contains mostly information for the github repository. You can ignore it..gitignoreIf you don't know what this is, you can simply ignore it.git. If you don't know what this is, you can simply ignore it.Android folder. This contains the wireframe of the app for Android. You should not modify anything in there, unless you really know what you're doingiOS folder. This contains the wireframe of the app for iOS. You should not modify anything in there, unless you really know what you're doing
Open the folder Input. It contains several folders:

android_icon. This folder contains the different resolutions of the icon of the app on Android. You should replace them all before publishing the app on the store. If you're too lazy, just delete 4 of the folders and only replace one (not advised).ios_icon. This folder contains the different resolutions of the icon of the app on iOS. You should replace them all before publishing the app on the store.android_splash. This folder contains all the different resolutions of the image that will appear on the screen after you launched the Android app, but before it finished loading. You should replace them all before publishing the app on the store.ios_splash. This folder contains all the different resolutions of the image that will appear on the screen after you launched the iOS app, but before it finished loading. You should replace them all before publishing the app on the store.Assets. This folder contains all the configuration of the app that we will work with right now. Open now the folder Assets and then the file called Config.json. Within this file, you can define several things:
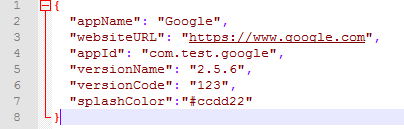
Picture Maker. Please note that using an apostrophe leads to the build failing sometimes. http://mydomain.com/path/to/mygame.php. This is the first thing the app will open. com.myappname.client. If you have no idea what this mean, simply replace "myappname" in the example by your app name without spaces or special characters. 1.3.7.122. It is for Google Play. Please note this number should increase, but you can also skip version numbers.#cc223a. It is going to be the color of the background of the splash screen when you launch the app, before it finished loading all the elements.Modify the content of the file to your liking, save and close the file.
Time needed: 4 minutes
In this section, we'll learn how to add static content to the app to prevent the app from downloading it. Within the HTML that is being served, you have tags serving content in the form of either fonts, css, js, sounds or images. Example: <img src="myimage/avatar.png">. All this content can be placed within the Input folder of AlmondBird, in the absolute path format without the domain.
For instance, if you image absolute path is https://www.domain.com/path/to/asset/image.png, you should place it under Input/Assets/path/to/asset/image.png
Please note the following important points:
Feel free to checkout out our Flippy Bird example if you would like to see a live example
Time needed: 2 minutes
Open your terminal, and naviguate to the folder of AlmondBird, where the file called generate.rb is located. Type in your terminal ruby generate.rb. Within a few seconds, it should tell you it is all completed.
Time needed: 5 minutes
Open Android Studio. On the splash menu, click on Open an existing Android Studio project. Naviguate to the folder of AlmondBird, then select the folder Output then the folder Android then select build.gradle. Important: Make sure you selected almondbird/Output/Android/build.gradle and NOT almondbird/Android/build.gradle
After a few seconds, you can go to the top menu and select Run then Run 'app'.
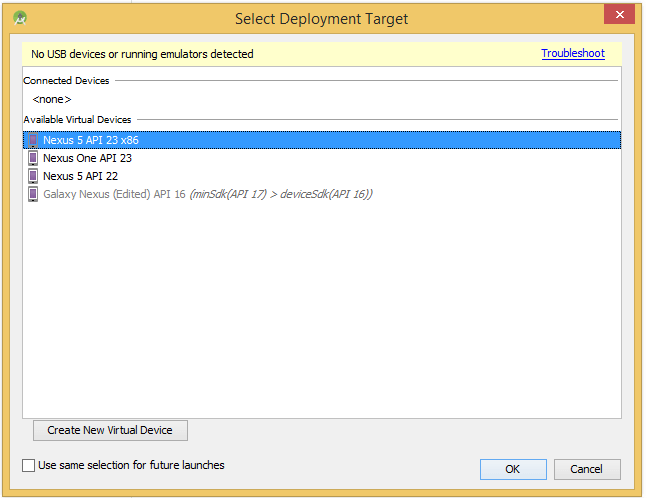
If anything else than the window above appears, please press "cancel" and wait a few more seconds that it finishes loading. Select an already pre-existing virtual device, else click on Create New Virtual Device and follow the steps. IT should take about 2 minutes to compile the code and launch an emulator for you to preview. The generated APK is now located under almondbird/Android/Test/app/build/outputs/apk
If you would like to generate signed APKs, please follow the official instructions here.
Time needed: 5 minutes
Open XCode. On the splash menu, click on Open another project.... Naviguate to the folder of AlmondBird, then select the folder Output then the folder iOS, then SmartWebView then select SmartWebView.xcodeproj. Important: Make sure you selected almondbird/Output/iOS/SmartWebView/SmartWebView.xcodeproj and NOT almondbird/iOS/SmartWebView/SmartWebView.xcodeproj
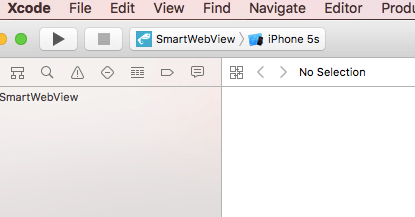
On top, make sure the buttons SmartWebView and iPhone 5s are selected. Then press on the "play" symbol.
If you would like to generate signed apps for iOS, please follow read more about it here.